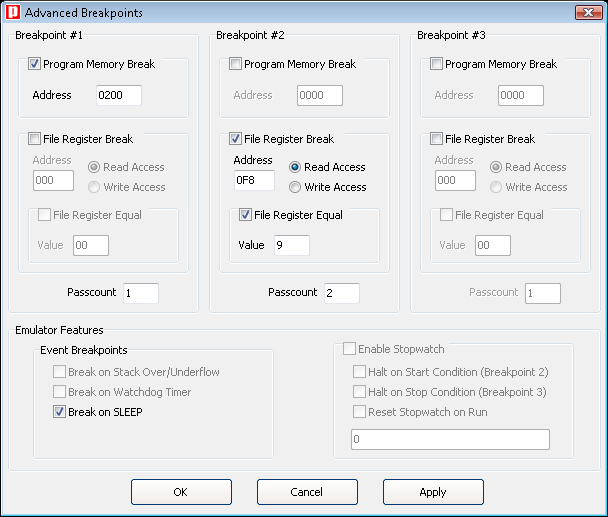
mikroICD Advanced Breakpoints
mikroICD provides the possibility to use the Advanced Breakpoints. Advanced Breakpoints can be used with PIC18 and PIC18FJ MCUs. To enable Advanced Breakpoints set the Advanced Breakpoints checkbox inside Watch window :

To configure Advanced Breakpoints, start mikroICD [F9] and select View › Debug Windows › Advanced Breakpoints option from the drop-down menu or use [Ctrl+Shift+A] shortcut.

 Note :
- When Advanced Breakpoints are enabled mikroICD operates in Real-Time mode, so it will support only the following set of commands:
Start Debugger[F9],Run/Pause Debugger[F6] andStop Debugger[Ctrl+F2]. Once the Advanced Breakpoint is reached, the Advanced Breakpoints feature can be disabled and mikroICD debugging can be continued with full set of commands. If needed, Advanced Breakpoints can be re-enabled without restarting mikroICD. - Number of Advanced Breakpoints is equal to number of Hardware breakpoints and it depends on used MCU.
Program Memory Break
Program Memory Break is used to set the Advanced Breakpoint to the specific address in program memory. Because of PIC pipelining mechanism program execution may stop one or two instructions after the address entered in the Address field. Value entered in the Address field must be in hex format.
 Note :
Program Memory Break can use the Passcount option. The program execution will stop when the specified program address is reached for the N-th time, where N is the number entered in the
 Passcount field. When some Advanced Breakpoint stops the program execution, passcount counters for all Advanced Breakpoints will be cleared.
File Register Break
File Register Break can be used to stop the code execution when read/write access to the specific data memory location occurs. If Read Access is selected, the File Register Equal option can be used to set the matching value. The program execution will be stopped when the value read from the specified data memory location is equal to the number written in the Value field.
Values entered in the Address and Value fields must be in hex format.
 Note :
File Register Break can also use the Passcount option in the same way as Program Memory Break.
Emulator Features
Event Breakpoints
- Break on Stack Overflow/Underflow : not implemented.
- Break on Watchdog Timer : not implemented.
- Break on SLEEP : break on SLEEP instruction. SLEEP instruction will not be executed. If you choose to continue the mikroICD debugging [F6] then the program execution will start from the first instruction following the SLEEP instruction.
Stopwatch
Stopwatch uses Breakpoint#2 and Breakpoint#3 as a Start and Stop conditions. To use the Stopwatch define these two Breakpoints and check the Enable Stopwatch checkbox.
Stopwatch options:
- Halt on Start Condition (Breakpoint#2) : when checked, the program execution will stop on
Breakpoint#2. Otherwise,Breakpoint#2will be used only to start the Stopwatch. - Halt on Stop Condition (Breakpoint#3) : when checked, the program execution will stop on
Breakpoint#3. Otherwise,Breakpoint#3will be used only to stop the Stopwatch. - Reset Stopwatch on Run : when checked, the Stopwatch will be cleared before continuing program execution and the next counting will start from zero. Otherwise, the next counting will start from the previous Stopwatch value.
What do you think about this topic ? Send us feedback!


